
DIY: Electric Fireplace
Are you itching for a fireplace in your house? My husband built us an electric fireplace for our bedroom and I love it!
8/2/20234 min read
Are you itching for a fireplace in your house? My husband built us an electric fireplace for our bedroom and is breaking down the steps so you can build one too!
Before we begin, I'm going to link the electric fireplace insert and mantle we used!! We absolutely LOVE them.
Linked Items:
Materials:
(1) 4x8 sheet of sanded plywood
(2) 1x6
Or however deep you want to go for the sides / mantle overhang reveal
Pick the height that gives you enough room to trim down
(1) 1x4
For the bottom trim. You can go thicker or go with a traditional / matching baseboard trim if that’s your thing
Pick the height that gives you enough room to trim down
Tools:
Tape Measure
Pencil
Straightedge to draw lines with
Something to cut the plywood with (circular saw, table saw, jigsaw, etc)
Something to cut the rectangle hole with (jigsaw, multi-tool)
Trim Nail Gun
Drill
Drill bit (if using jigsaw)
WARNING: I would highly recommend taping out these dimensions with painters tape on your wall to make sure the scale looks good before blindly diving into this specific example on how to build a version of this.
IMPORTANT TO NOTE:
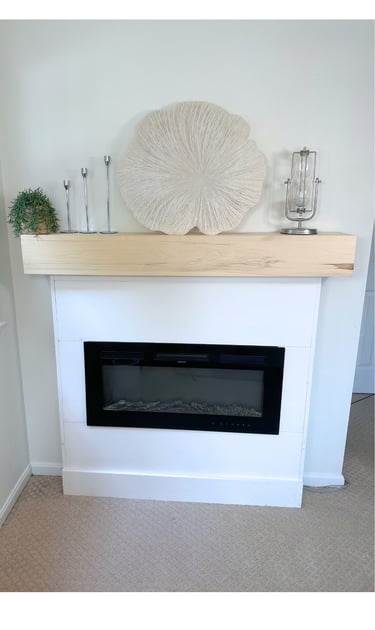
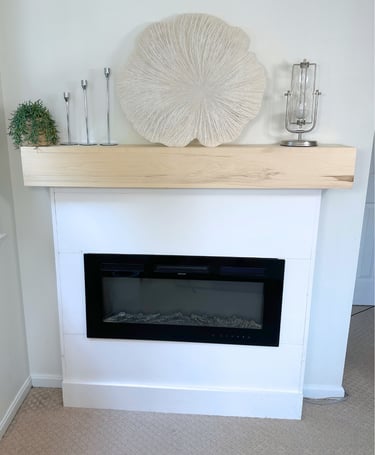
The mantle is separate, mounts on it’s own, and holds any load you’d put on it by itself. These directions are simply just for the part that holds the fireplace.
I use a 4x8 sheet of plywood in this tutorial, meaning the width of the piece will only be 48” inches wide. Keep that in mind depending on which fireplace width / mantle width you buy. If you want something wider than this, the build becomes a little more complex to achieve a bigger width than 48” inches. I personally did run into this, because in order to have the scale of the mantle and fireplace fill the wall we were using appropriately, I did have to get creative on making this wider; and that's why if you look closely at ours you will see more seams I haven’t gotten around to filling yet.
—
STEP 1: At your desired height, mount the pre-built mantle to your wall studs using the provided wall cleat in the box.
TIP: I always try to leave myself a round number. For example, if I like the top of the mantle visually on the wall at 57 ¾” (completely made this number up - don’t need to use it), just bump it to 58” or 57”. I always feel like remembering / measuring round numbers is easier but go for what works for you.
STEP 2: Measure the distance between the underside of the mantle, and the floor. Cut your ¾” 4x8 sheet of sanded plywood to that height. Always good to test fit it at this point.
TIP: If it’s not 100% perfect fit, rather than buying / recutting a new sheet of plywood - you can hide it later with decorative trim at either that top gap and the mantle if you want to get fancy.
STEP 3: Horizontally from the left and right side, center up the dimensions of the rectangle cut out the fireplace directions specify.
Vertically, I chose not to center it top to bottom; and rather have more space above the fireplace than below it. This is personal preference, so go for whatever looks good to you.
STEP 4: Once you have the rectangle of the cut out traced onto your plywood, feel free to cut it out with whatever technique you feel comfortable with.
Remember - the perimeter line cuts of the rectangle don’t need to be laser straight because the fireplace itself has a lip around the edge to hide that hole. As long as your cuts aren't crazy wavy, a slight deviation from your line isn't the end of the world as long as the fireplace slides in.
If you go the jigsaw route, I find that drilling holes roughly in all 4 corners, making it easy to make the 4 straight cuts. Find a drill bit that has a diameter big enough to plunge the jigsaw blade through it - that’s how you can start your cuts.
TIP: As you make your cuts, don’t worry about getting the corners perfect at first with the jigsaw, just get close enough you feel comfortable with, then you can go back and clean up the corners with the jigsaw once it’s knocked out for more precision.
STEP 5: Tack the 1x1 square dowels to each side as blocking for you to nail the side returns to, as well as add one more piece to the bottom of the rectangle cut out to create a little more of a shelf for the unit.
I prefer to have the edges of the return pieces and the seam not show from the front, so I indented these 1x1 square dowels in the thickness of the return pieces so the edges are hidden behind the face and the seam is on the side.
TIP: Rough cut your return piece to be a few inches longer than you actually need. You can then lay it on the plywood and line it up perfectly, then draw a pencil line as you guide on where / how far to indent the 1x1 piece. I find this to be quicker and easier to get a flush fit rather than messing with measuring.
STEP 6: Cut your return pieces to height to match the plywood, and tack into the 1x1 from the sides.
The depth of this is personal preference, we had a smaller area to work with so I kept it pretty shallow, but deep enough to receive the fireplace and the clearance of room behind the unit they specify in the directions to allow proper circulation and safety of the heating elements.
STEP 7: Flip it over, tack the side return pieces from the face front. Give it another test fit.
STEP 8: Add trim to the bottom with your personal preference height. I used butt joints for the sake of ease, but feel free to mitre those corners if you feel confident enough.
STEP 9: Prep and paint!
STEP 10: Set into place, mount the fireplace per the directions, and enjoy!